Magento is one of the leading eCommerce platforms in the world thanks to many useful features it offers. With Magento store, you can help your customers buy products with ease, thereby increasing your sales. For the ease of customers, it’s a great way to offer multiple shipping ways for their purchased products.
When it comes to arranging shipping, sometimes custom methods and regions would be required – that’s where Magento 2 Shipping Suite Ultimate comes in handy. However, when you are looking for the top regular Magento shipping methods, then you can’t neglect that DHL is one of the most famous courier services in the world. By default, Magento offers you multiple shipping methods and also allows you to easily configure Magento DHL integration.
Table of Contents
How to set up and configure Magento DHL integration?
Today, in this guide, I will explain to you how to set up and configure Magento DHL integration.
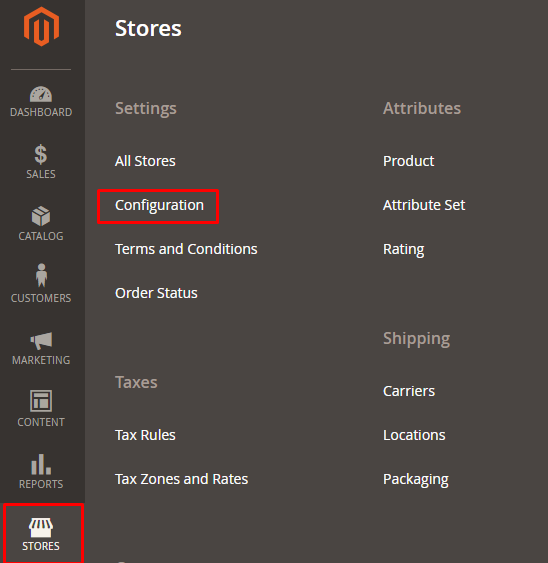
Open the admin panel of your Magento 2 store and navigate to Stores → Configuration:
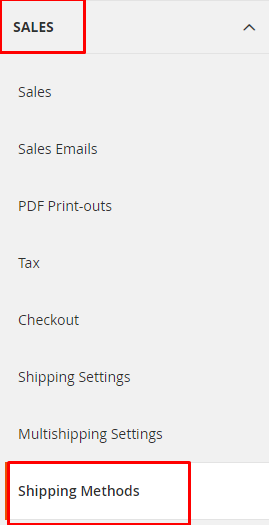
Now, click on the Magento Shipping Methods option under Sales:
Unfold the DHL section:
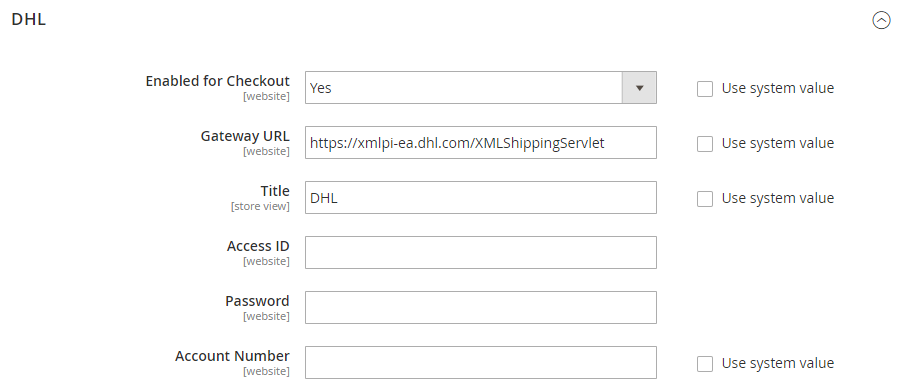
Let’s explore the options provided by Magento DHL:
Enable for Checkout: Select ‘Yes’ from the drop-down menu
Gateway URL: Enter the Gateway URL for calculating Magento DHL shipping rate. By default, there is already a URL but if you have any other URL, then you can replace the default one.
Title: Enter the title for the shipping method name to use it as a reference during checkout.
Access ID, Password, Account Number: Enter the credentials of your Magento DHL account.
Setup Description and Handling Fees
Here you can easily setup package description and handling fee:
Note: Setting up the handling fee is optional.
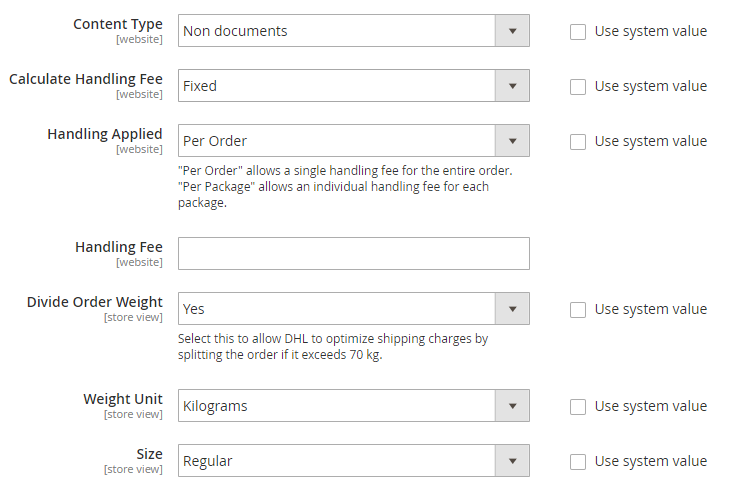
Content Type: Select one option, Documents or Non-documents for the type of package you ship.
Calculate Handling Fee: Select one method Fixed or Percent that you want to use for the handling fee calculation.
Handling Applied: Select one option to specify how you want to apply the handling fee.
Handling Fee: Enter the amount you want to charge for shipping.
Divide Order Weight: If you want to allow the total order weight to be broken up in order to ensure an accurate calculation of shipping charges, select the ‘Yes’ option.
Weight Unit: Choose Kilograms or Pounds.
Size: Select the size of the package, Regular or Specific. If you select Specific, then you have to enter the Height, Depth, and Width of the package in centimeters.
Specify Shipping Methods
Magento DHL module provides you an option to enable single or multiple shipping methods on your store. Therefore, here, you have to assign the allowed shipping methods:
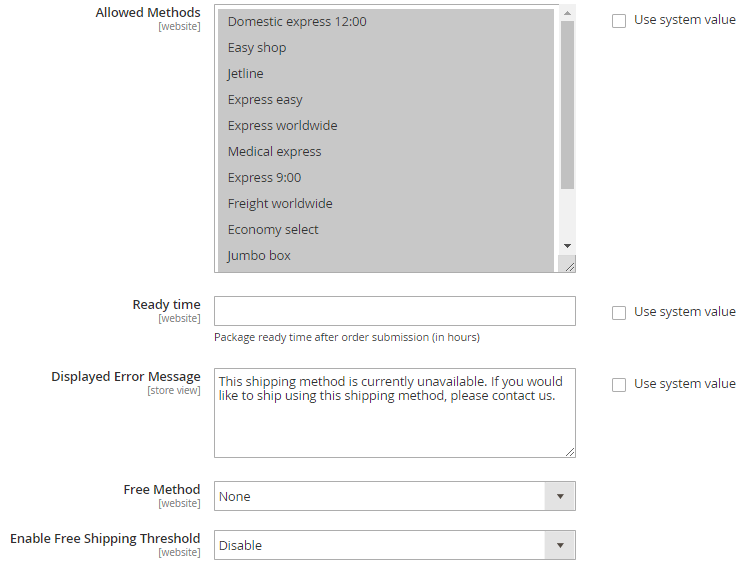
Allowed Methods: Select shipping methods that you want to allow on your store.
In the Ready Time field, enter package ready time in the number of hours after submission of an order.
Set the Ready Time to ship the order after submission.
Ready Time: Enter the time that it’ll take to get ready the package to ship after order submission.
Display Error Message: Enter the message which you want to show to the customers when their selected method is not available.
Free Method: If you want to offer any free shipping methods, then select that method from the drop-down menu.
Enable Free Shipping Threshold: Select Enable from the drop-down menu and set the minimum number of orders allowed for free shipping.
Specify Allowed Countries
You can allow Magento DHL for all or selected countries according to your Magento DHL shipping method:
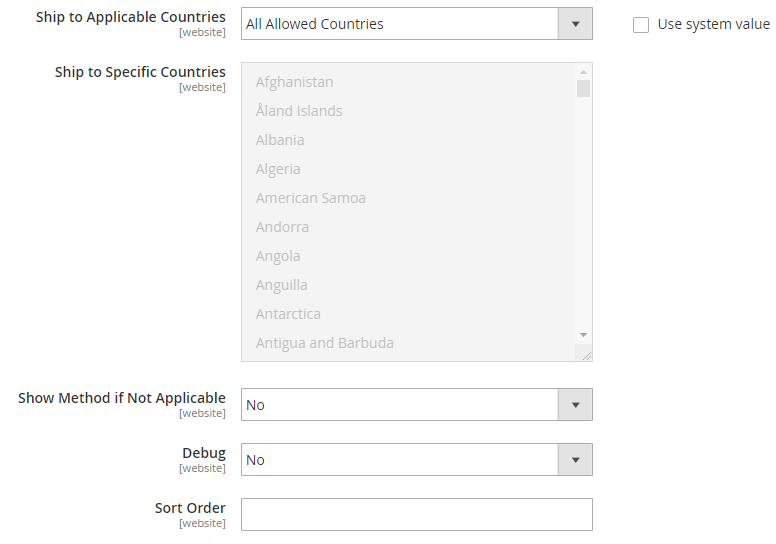
Ship to Applicable Countries: If you want to allow for all countries then select All Allowed Countries option, or else, select Specific Countries.
Show Method if Not Applicable: Select Yes if you want to show Magento DHL method with the error message.
Debug: Select Yes if you want to create log files with all the details of Magento DHL
Sort Order: Enter the number on which you want to display Magento DHL shipping method.
At last, just click the Save Config button:

Magento DHL integration is complete!
Final Words
There are many tactics behind increasing the sales and conversion flow of an ecommerce store and one of the most common ones is providing your customers with an easier way of shopping. After reading this tutorial, I believe you can now easily setup and configure Magento DHL integration.
***
Still facing any issues? Just leave the comment below and I will get back to you.
Author Bio
Syed Muneeb Ul Hasan is a Magento Developer and Blogger at Magenticians – a platform for learning Magento. He is an expert in PHP and Magento and prefers to educate users in the implementation of Magento. When not working, he loves to play games and watch cricket. You can follow him on Twitter.


Hi, thank you for your article.
I’m using the DHL shipping on Magento 2.3.4 but I cannot get rates from DHL based on the specific size of each item. It works with the weight, but not the size. When I look at the log, only the weight is sent but the size value is zero (width, length, depth). I selected the size “REGULAR” and expected the size to be sent to DHL, alongside the weight.
CMKG10.0000.0000.0001.249
What do I need to do to be able to calculate volumetric weight using both size and weight for the orders?
Thank you in advance for your help.
Hello Philippe,
Thank you for your comment.
In the standard DHL extension, sizes are used to define the number of packages that are to be sent.
The configurations are limited to 2 variants, i.e., standard size and specific size. Both of them are used by the `_addDimension` method of `\Magento\Dhl\Model\Carrier` class. Specific sizes get specified only if a specific size is selected in the configurations. The method itself gets in the ordered chain, starting with the `collectRates` method of a corresponding class, which triggers the `_getQuotes method, where the `_buildQuotesRequestXml` gets triggered. There, to obtain rates, a request body to the DHL server gets formed. There, also, the size gets added when calling `$this->_makePieces($nodeBkgDetails);` that’s exactly where the method that fills the `_addDimension` sizes under various conditions is called. If there is no data in the request body, it’d be best to start debugging from the `_addDimension` method.