In this article, we are going to create a simple module that will add a fieldset with fields in the product editing UI-form. Also, we will create an observer to intercept this data during the product saving.
First, we need to create a Vendor_Product module:
1. Create a directory app/code/Vendor/Product
2. Create a registration file app/code/Vendor/Product/registration.php with the following content:
    <?php
    \Magento\Framework\Component\ComponentRegistrar::register(
        \Magento\Framework\Component\ComponentRegistrar::MODULE,
        'Vendor_Product',
        __DIR__
    );
    ?>
Create a composer file (if you plan to transfer the module) app/code/Vendor/Module/composer.json :
    {
        "name": "vendor/module-product",
        "description": "N/A",
        "type": "magento2-module",
        "version": "1.0.0",
        "license": [
            "OSL-3.0",
            "AFL-3.0"
        ],
        "autoload": {
            "files": [
                "registration.php"
            ],
            "psr-4": {
                "Vendor\\Product\\": ""
            }
        }
    }
Now, create the module’s main XML-file app/code/Vendor/Product/etc/module.xml with the dependency from the Magento_Catalog module because our modal window will be added to its form:
    <?xml version="1.0"?>
    <config xmlns:xsi="https://www.w3.org/2001/XMLSchema-instance" xsi:noNamespaceSchemaLocation="urn:magento:framework:Module/etc/module.xsd">
        <module name="Vendor_Product" setup_version="1.0.0">
            <sequence>
                <module name="Magento_Catalog"/>
            </sequence>
        </module>
    </config>
Enable the module by entering the following: bin/magento module:enable Vendor_Product and bin/magento setup:upgrade in the root Magento directory.
Then, add the content of the module: the UI-form meta-data and virtual type for its addition.
Create a file app/code/Vendor/Product/etc/adminhtml/di.xml. We are going to place a modifier inside:
<?xml version="1.0"?>
<config xmlns:xsi="https://www.w3.org/2001/XMLSchema-instance" xsi:noNamespaceSchemaLocation="urn:magento:framework:ObjectManager/etc/config.xsd">
    <virtualType name="Magento\Catalog\Ui\DataProvider\Product\Form\Modifier\Pool">
        <arguments>
            <argument name="modifiers" xsi:type="array">
                <item name="custom-fieldset" xsi:type="array">
                    <item name="class" xsi:type="string">Vendor\Product\Ui\DataProvider\Product\Form\Modifier\CustomFieldset</item>
                    <item name="sortOrder" xsi:type="number">10</item>
                </item>
            </argument>
        </arguments>
    </virtualType>
</config>
The modifier is responsible for data addition and some manipulations with elements and UI-form components. There are 2 main methods that came from the modifier’s interface (they should always present):
    <?php
    /**
     * Copyright © 2016 Magento. All rights reserved.
     * See COPYING.txt for license details.
     */
    namespace Magento\Ui\DataProvider\Modifier;

    /**
     * Class ModifierInterface
     */
    interface ModifierInterface
    {
        /**
         * @param array $data
         * @return array
         */
        public function modifyData(array $data);

        /**
         * @param array $meta
         * @return array
         */
        public function modifyMeta(array $meta);
    }
    ?>
We are going to use the modifyMeta method in this example. The modifyData method will be explained in the next article.
Now, create the modifier file (app/code/Vendor/Product/Ui/DataProvider/Product/Form/Modifier/CustomFieldset.php) with a custom fieldset for the product editing page and fill it with the fields:
<?php
namespace Vendor\Product\Ui\DataProvider\Product\Form\Modifier;

use Magento\Catalog\Model\Locator\LocatorInterface;
use Magento\Catalog\Ui\DataProvider\Product\Form\Modifier\AbstractModifier;
use Magento\Framework\Stdlib\ArrayManager;
use Magento\Framework\UrlInterface;
use Magento\Ui\Component\Container;
use Magento\Ui\Component\Form\Fieldset;
use Magento\Ui\Component\Form\Element\DataType\Number;
use Magento\Ui\Component\Form\Element\DataType\Text;
use Magento\Ui\Component\Form\Element\Input;
use Magento\Ui\Component\Form\Element\Select;
use Magento\Ui\Component\Form\Element\MultiSelect;
use Magento\Ui\Component\Form\Field;

class CustomFieldset extends AbstractModifier
{

    // Components indexes
    const CUSTOM_FIELDSET_INDEX = 'custom_fieldset';
    const CUSTOM_FIELDSET_CONTENT = 'custom_fieldset_content';
    const CONTAINER_HEADER_NAME = 'custom_fieldset_content_header';

    // Fields names
    const FIELD_NAME_TEXT = 'example_text_field';
    const FIELD_NAME_SELECT = 'example_select_field';
    const FIELD_NAME_MULTISELECT = 'example_multiselect_field';

    /**
     * @var \Magento\Catalog\Model\Locator\LocatorInterface
     */
    protected $locator;

    /**
     * @var ArrayManager
     */
    protected $arrayManager;

    /**
     * @var UrlInterface
     */
    protected $urlBuilder;

    /**
     * @var array
     */
    protected $meta = [];

    /**
     * @param LocatorInterface $locator
     * @param ArrayManager $arrayManager
     * @param UrlInterface $urlBuilder
     */
    public function __construct(
        LocatorInterface $locator,
        ArrayManager $arrayManager,
        UrlInterface $urlBuilder
    ) {
        $this->locator = $locator;
        $this->arrayManager = $arrayManager;
        $this->urlBuilder = $urlBuilder;
    }

    /**
     * Data modifier, does nothing in our example.
     *
     * @param array $data
     * @return array
     */
    public function modifyData(array $data)
    {
        return $data;
    }

    /**
     * Meta-data modifier: adds ours fieldset
     *
     * @param array $meta
     * @return array
     */
    public function modifyMeta(array $meta)
    {
        $this->meta = $meta;
        $this->addCustomFieldset();

        return $this->meta;
    }

    /**
     * Merge existing meta-data with our meta-data (do not overwrite it!)
     *
     * @return void
     */
    protected function addCustomFieldset()
    {
        $this->meta = array_merge_recursive(
            $this->meta,
            [
                static::CUSTOM_FIELDSET_INDEX => $this->getFieldsetConfig(),
            ]
        );
    }

    /**
     * Declare ours fieldset config
     *
     * @return array
     */
    protected function getFieldsetConfig()
    {
        return [
            'arguments' => [
                'data' => [
                    'config' => [
                        'label' => __('Fieldset Title'),
                        'componentType' => Fieldset::NAME,
                        'dataScope' => static::DATA_SCOPE_PRODUCT, // save data in the product data
                        'provider' => static::DATA_SCOPE_PRODUCT . '_data_source',
                        'ns' => static::FORM_NAME,
                        'collapsible' => true,
                        'sortOrder' => 10,
                        'opened' => true,
                    ],
                ],
            ],
            'children' => [
                static::CONTAINER_HEADER_NAME => $this->getHeaderContainerConfig(10),
                static::FIELD_NAME_TEXT => $this->getTextFieldConfig(20),
                static::FIELD_NAME_SELECT => $this->getSelectFieldConfig(30),
                static::FIELD_NAME_MULTISELECT => $this->getMultiSelectFieldConfig(40),
            ],
        ];
    }

    /**
     * Get config for header container
     *
     * @param int $sortOrder
     * @return array
     */
    protected function getHeaderContainerConfig($sortOrder)
    {
        return [
            'arguments' => [
                'data' => [
                    'config' => [
                        'label' => null,
                        'formElement' => Container::NAME,
                        'componentType' => Container::NAME,
                        'template' => 'ui/form/components/complex',
                        'sortOrder' => $sortOrder,
                        'content' => __('You can write any text here'),
                    ],
                ],
            ],
            'children' => [],
        ];
    }

    /**
     * Example text field config
     *
     * @param $sortOrder
     * @return array
     */
    protected function getTextFieldConfig($sortOrder)
    {
        return [
            'arguments' => [
                'data' => [
                    'config' => [
                        'label' => __('Example Text Field'),
                        'formElement' => Field::NAME,
                        'componentType' => Input::NAME,
                        'dataScope' => static::FIELD_NAME_TEXT,
                        'dataType' => Number::NAME,
                        'sortOrder' => $sortOrder,
                    ],
                ],
            ],
        ];
    }

    /**
     * Example select field config
     *
     * @param $sortOrder
     * @return array
     */
    protected function getSelectFieldConfig($sortOrder)
    {
        return [
            'arguments' => [
                'data' => [
                    'config' => [
                        'label' => __('Options Select'),
                        'componentType' => Field::NAME,
                        'formElement' => Select::NAME,
                        'dataScope' => static::FIELD_NAME_SELECT,
                        'dataType' => Text::NAME,
                        'sortOrder' => $sortOrder,
                        'options' => $this->_getOptions(),
                        'visible' => true,
                        'disabled' => false,
                    ],
                ],
            ],
        ];
    }

    /**
     * Example multi-select field config
     *
     * @param $sortOrder
     * @return array
     */
    protected function getMultiSelectFieldConfig($sortOrder)
    {
        return [
            'arguments' => [
                'data' => [
                    'config' => [
                        'label' => __('Options Multiselect'),
                        'componentType' => Field::NAME,
                        'formElement' => MultiSelect::NAME,
                        'dataScope' => static::FIELD_NAME_MULTISELECT,
                        'dataType' => Text::NAME,
                        'sortOrder' => $sortOrder,
                        'options' => $this->_getOptions(),
                        'visible' => true,
                        'disabled' => false,
                    ],
                ],
            ],
        ];
    }

    /**
     * Get example options as an option array:
     *      [
     *          label => string,
     *          value => option_id
     *      ]
     *
     * @return array
     */
    protected function _getOptions()
    {
        $options = [
            1 => [
                'label' => __('Option 1'),
                'value' => 1
            ],
            2 => [
                'label' => __('Option 2'),
                'value' => 2
            ],
            3 => [
                'label' => __('Option 3'),
                'value' => 3
            ],
        ];

        return $options;
    }
}
?>
In this example we need to take the existing UI-form meta-data and merge it (not rewrite!) with our new data:
<?php
/**
 * Merge existing meta-data with our meta-data (do not overwrite it!)
 *
 * @return void
 */
protected function addCustomFieldset()
{
    $this->meta = array_merge_recursive(
        $this->meta,
        [
            static::CUSTOM_FIELDSET_INDEX => $this->getFieldsetConfig(),
        ]
    );
}
?>
When done, add the new fieldset to the getFieldsetConfig method:
<?php
/**
 * Declare ours fieldset config
 *
 * @return array
 */
protected function getFieldsetConfig()
{
    return [
        'arguments' => [
            'data' => [
                'config' => [
                    'label' => __('Fieldset Title'),
                    'componentType' => Fieldset::NAME,
                    'dataScope' => static::DATA_SCOPE_PRODUCT, // save data in the product data
                    'provider' => static::DATA_SCOPE_PRODUCT . '_data_source',
                    'ns' => static::FORM_NAME,
                    'collapsible' => true,
                    'sortOrder' => 10,
                    'opened' => true,
                ],
            ],
        ],
        'children' => [
            static::CONTAINER_HEADER_NAME => $this->getHeaderContainerConfig(10),
            static::FIELD_NAME_TEXT => $this->getTextFieldConfig(20),
            static::FIELD_NAME_SELECT => $this->getSelectFieldConfig(30),
            static::FIELD_NAME_MULTISELECT => $this->getMultiSelectFieldConfig(40),
        ],
    ];
}
?>
We inherit from the abstract product UI-form modifier and use its namespace and data as a provider: ‘provider’ => static::DATA_SCOPE_PRODUCT . ‘_data_source’ (where DATA_SCOPE_PRODUCT is the ‘data.product’ line).
The componentType option is one of the main options and is responsible for the component type. The collapsible option is responsible for collapsing and expanding of our fieldset. And the open option defines wheter the fieldset will be open by default during the form drawing.
Then, we consequently add a header to our fieldset in the getHeaderContainerConfig method and 3 examples of fields: text, select and multiselect. However, our product and form won’t receive data until we add it to the modifyData method. But we have the ability to transmit and intercept the data during saving.
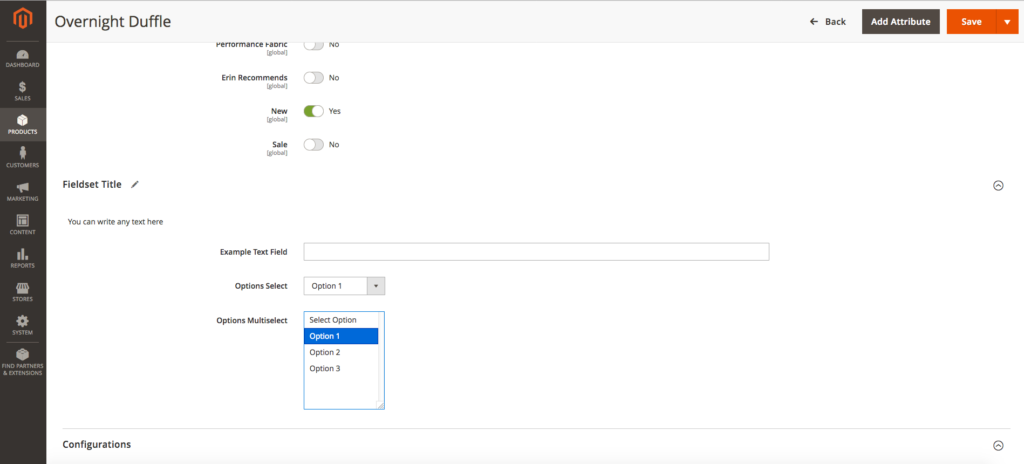
Let’s see how the form is look:
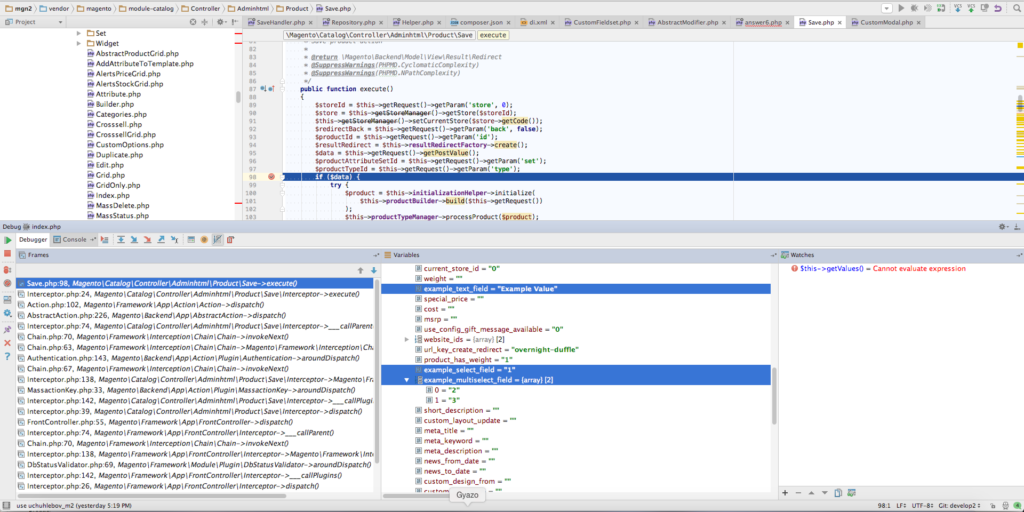
 The data saving takes place inside the product controller file vendor/magento/module-catalog/Controller/Adminhtml/Product/Save.php in the main execute method. If everything has been done in the right way, then our data will be displayed correctly in the input data of this method:
 Note, if your product doesn’t have those attributes from the beginning, you should save them manually. You can do this in the observer.
First, declare it in the app/code/Vendor/Product/etc/adminhtml/events.xml file (we are using the adminhtml scope because the form doesn’t exist on the front-end):
<?xml version="1.0"?>
<config xmlns:xsi="https://www.w3.org/2001/XMLSchema-instance" xsi:noNamespaceSchemaLocation="urn:magento:framework:Event/etc/events.xsd">
    <event name="catalog_product_save_after">
        <observer name="save_example_data" instance="Vendor\Product\Observer\ProductSaveAfter" />
    </event>
</config>
Then, create the observer’s class that we pointed in the instance attribute – app/code/Vendor/Product/Observer/ProductSaveAfter.php:
<?php
namespace Vendor\Product\Observer;

use \Magento\Framework\Event\ObserverInterface;
use \Magento\Framework\Event\Observer as EventObserver;
use Vendor\Product\Ui\DataProvider\Product\Form\Modifier\CustomFieldset;

class ProductSaveAfter implements ObserverInterface
{

    /**
     * @param EventObserver $observer
     */
    public function execute(\Magento\Framework\Event\Observer $observer)
    {
        /** @var \Magento\Catalog\Model\Product $product */
        $product = $observer->getEvent()->getProduct();
        if (!$product) {
            return;
        }

        $exampleTextField = $product->getData(CustomFieldset::FIELD_NAME_TEXT);
        $exampleSelectField = $product->getData(CustomFieldset::FIELD_NAME_SELECT);
        $exampleMultiSelectField = $product->getData(CustomFieldset::FIELD_NAME_MULTISELECT);

        // Manipulate data here
    }
}
?>
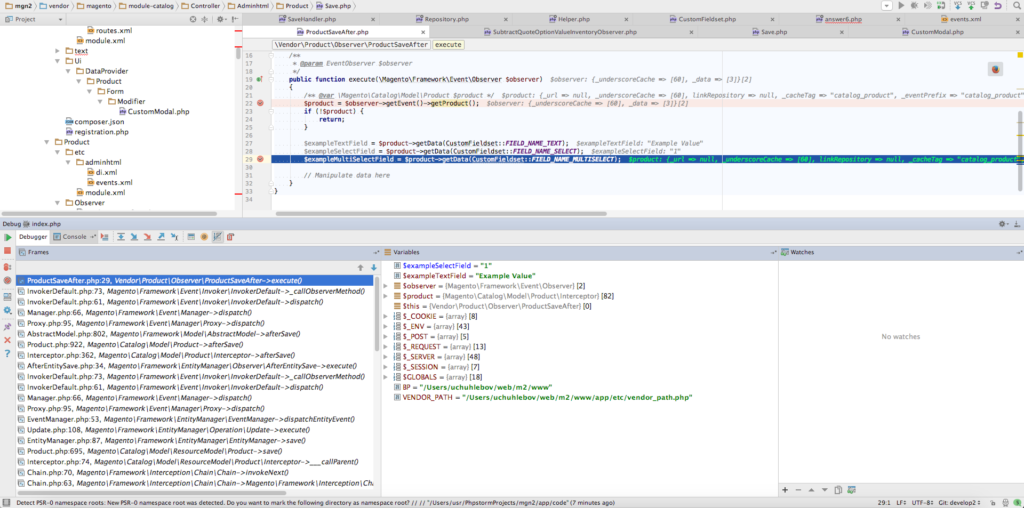
The data in the observer:

Now, you can call your own model from the observer and save data in it or modify it as you wish.
Be careful! If the saving of your model is connected with the product saving, then it can lead to the recurssion.


Nice article. Thanks for your effort, May i ask one question, Can we implement same concept for to create dynamic rows when check new new button like custom options?
Hello Mani, thank you for the question. Could you please give us more details on what you would like to achieve. An example would work the best. Thank you in advance.